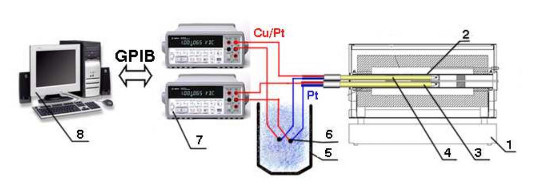
Just like every other products, measuring instruments also losing their properties over time. How time, environment, usage, or other conditions influence properties will be known through performing regular calibrations. By calibrating instrument, we can determine stability, drift, or other properties to predict reliability of measured data and measuring instrument itself. According my common experience I have noticed many of us are under wrong understanding about what calibration truly is. Therefore, let’s pull out our VIM vocabulary to see how it is defined.
- Calibration – operation that, under specified conditions, in a first step, establishes a relation between the quantity values with measurement uncertainties provided by measurement standards and corresponding indications with associated measurement uncertainties and, in a second step, uses this information to establish a relation for obtaining a measurement result from an indication.
- NOTE 1 A calibration may be expressed by a statement, Calibration function, calibration diagram, calibration curve, or calibration table. In some cases, it may consist of an additive or multiplicative correction of the indication with associated measurement uncertainty.
- NOTE 2 Calibration should not be confused with adjustment of a measuring system, often mistakenly called “self-calibration”, nor with verification of calibration.
- NOTE 3 Often, the first step alone in the above definition is perceived as being calibration.
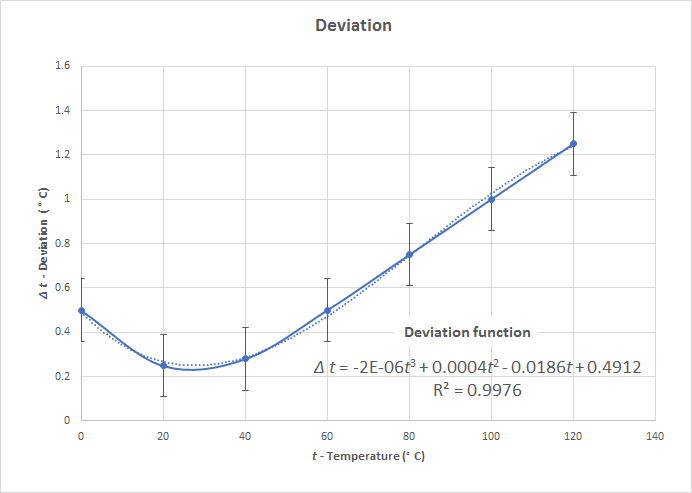
After reading definition let’s explain each case. Note 1: Relation between quantity values with measuring uncertainties provided by measurement standard and indication of a calibrated instrument. This relation could be represented by linear, polynomial, or other mathematical function describing instrument behavior (see Fig. 1.1 and Fig. 1.2) on external stimulus, some examples like thermocouple by polynomial function, thermistor by exponenential function, or simply by determining error by subtracting indication from conventional true value or calculating multiplicative factor using them as a correction of the indication.
Figure 1.1 – Calibration curve and estimated calibration function
Figure 1.2 – Deviation function – expressing deviation from manufacturers calibration function
What is crucial to understand, and basically this the point of this contribution, please remember Note 2: Calibration is not adjustment! By calibration I will find out only relation between values provided by standard and corresponding indication. If you expected by calibration, your instrument will be adjusted and verified and will get again reliable measurements without considering further findings, you are wrong. If you want full service, that means calibration, adjustment and verification with a statement of pass or fail of specified permissible error or other metrological requirements you need to ask your metrology organisation for metrological confirmation. There is a standard
ISO 10012: Measurement management systems — Requirements for measurement processes and measuring equipment
, which gives a guidance how to proceed with metrological confirmation.
And also please keep in mind all seriouse metrology organization are providing calibration services which are in compliance with standards as such
ISO 9001 Quality management systems
and
ISO 17025 General requirements for the competence of testing and calibration laboratories
Another fact what needs to be mentioned about calibration is its traceability. Calibration must be traceable. There are legal and technical reasons for being traceable. Main element of traceability is an unbroken chain of comparisons leading toward national or international standard. By being traceable we will declare realization of the unit of a measured quantity. As it was mentioned above measurement uncertainty is also a key element of a traceability chain.
As an outcome of every calibration is a Calibration certificate which has all the features stated in ISO 17025. And what is the cost of not calibrated instrument? In industry a production stop, bad quality, non-conformed product and if we are going further, specially in pharmaceutical industry or medical device industry can have huge impact on human safety. The best prevention to avoid all these risks is to set up calibration program.
References:
(1) VIM International vocabulary of metrology – Basic and general concepts and associated terms


