Most of the businesses have to be very considerate about their budged. Making profit, quality management system needs to be adjusted in a cost effective way. The most common mistake what managers do, in order to save, is underestimating importance of metrology system and neglecting them. It all starts with extending calibration periods, reducing samples of measurements, numbers of repetitions, losing traceability, not able to follow trend of measuring instruments, until system is completely ruined.
If the decision has been made, and need to save on metrology, only solution what appears to me, is to redesign
our metrology system. Here comes to play a standard ISO 10 012 called Measurement management systems – Requirements for measurement processes and measurement equipment [1].
Usually noone wants to reduce quality objectives, those are mostly defined by customer anyway, and being competitive, company has to follow market needs in terms of quality of product as well.
Let’s review the manufacturing process than, see where are those critical points, what are the requirements for the product and how the measurement is accomplished. A lot of measuring instrument allows to measure different features of the product, and only one their function is used i.e. Vernier caliper allows you to measure outside dimensions, inside dimensions, depth and step.
In this case extending calibration period of a vernier caliper make sense, only if we will introduce more frequent internal check. Obviously, there has to be done some calculation which one is more cost effective, to get a full calibration and maintain calibration period or paying staff to perform internal check. Also give a thought about your measurement uncertainties and maximum permissible errors.
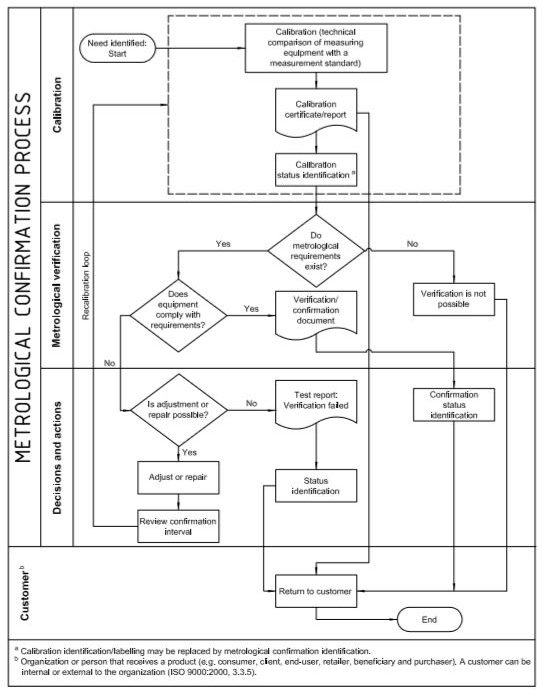
ISO 10 012 gives you an option to ensure that measuring equipment conforms to the requirements for its intended use. This process is called metrological confirmation.
NOTE 1 Metrological confirmation generally includes calibration and verification, any necessary adjustment or repair, and subsequent recalibration, comparison with the metrological requirements for the intended use of the equipment, as well as any required sealing and labeling.
NOTE 2 Metrological confirmation is not achieved until and unless the fitness of the measuring equipment for the intended use has been demonstrated and documented.
NOTE 3 The requirements for intended use include such considerations as range, resolution and maximum permissible errors.
NOTE 4 Metrological requirements are usually distinct from, and are not specified in, product requirements.
NOTE 5 A diagram of the processes involved in metrological confirmation is given in Figure 1
 Figure 1: Metrological confirmation process
References:
[1] ISO 10 012 Measurement management systems – Requirements for measurement processes and measurement equipment

