Introduction
Write down what you do, do what is written. This is the main idea of every quality system. Whether we are talking about manufacturing company or a company providing service, Quality Management System ISO 9001 is considered as a standard requirement to succeed. If we are talking about laboratories, there are additional requirements, which need to be fulfilled given by ISO 17025 standard - General requirements for the competence of testing and calibration laboratories. We just simply call it: Laboratory need to be accredited. However not a laboratory is accredited, but the service provided by laboratory. One of the criteria to apply for accreditation is to have complete description about measurement, calibration or testing process including measurement uncertainties. For evaluation of measurement uncertainties we have ISO GUM (Guide to the Expression of Uncertainty in Measurement). To evaluate uncertainty of measurement first of all, we need to understand the measurement process. In this article I would like to focus on evaluation of uncertainty of dimensional measurement – using a CMM machine for measurement.
CMM measurement
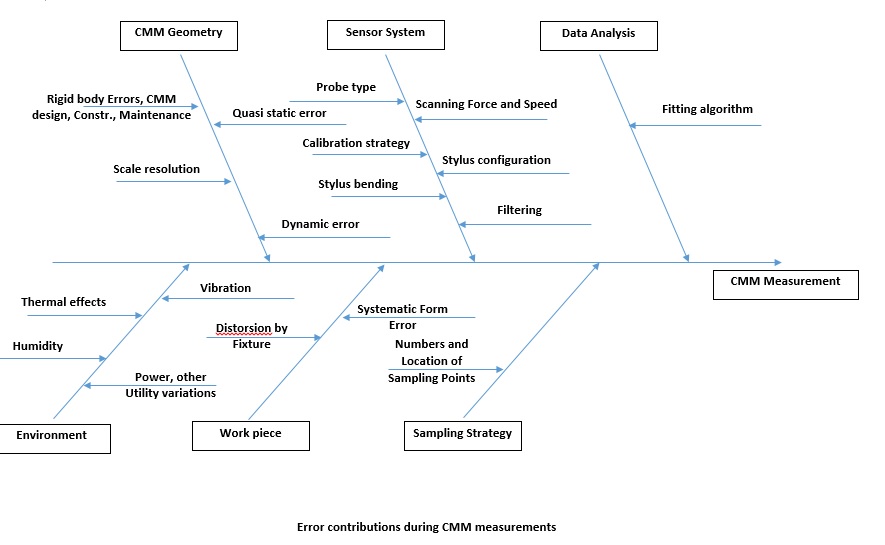
CMM is a representation of Cartesian coordinate system. CMM is composed by three axis, X, Y and Z. Each axis has a scale system that indicates the position on the axis. The exact position of the point is sensed and recorded by probe. This probe can be fixed - a star probe or can be articulated one. As a datum reference CMM has Granite table. That also gives to machine robustness and rigidity for the precision positioning. CMM machines are very versatile machines. They are considered as a King of dimensional measurement instruments usually characterized with excellent metrological parameters. One of the biggest advantage of CMM machines that they are perfectly fitted to measure all sort of geometrical properties of the measured object by applying Geometrical Dimensioning and Tolerancing System. Geometrical Dimensioning and Tolerancing system is an engineering language. Behind this language is a hidden part of mathematics related to statistics. Statistical methods are applied to get position of points or form of features. Therefore there is a doubt if we can look at the measurement process by CMM as a direct measurement. The first what we have to realize when we want to design a model of measurement by CMM: we are measure length of the work piece from one point to another – it is a direct measurement. If we measure diameter of the hole, where we are looking for minimum and maximum value on the circle it is still a direct measurement, but if we are taking series of points on circumference of the hole and using equation – theorem of Pythagoras R2=x2+y2, than we can not consider it as a direct measurement. For second, to carry on with evaluation of the uncertainty we have to analyze source of systematic errors . I did it and illustrating that by fishbone diagram. We can see some influences, what need to be taken under control like temperature, humidity, level of vibration...
Model of Measurement
If we assume the case of direct measurement – i.e length measurement between two points
L_x=(L_x ) ̅+δl_R+δl_C+δl_TE+δl_MA+δl_FU
L_x estimation from repeated measurements and after applied corrections
(L_x ) ̅ repeatability and reproducibility – R&R
repeatability – when repeated measurements are made of the same item under identical conditions
reproducibility- when repeated measurements are made when different conditions are used
these contributions can involve:
repeated measurements at low and high speed
repeated measurements is taken when the work piece is at different position of meas. space
repeated measurements with same work piece with different diameter of the stylus
with the same work piece different # of points during measurement, i.e: 2 for line or 5 for line
repeated measurement different angle and position - angle of probe
repeated measurement for metal sheet with fixture, without fixture
repeated measurements with nr. of iteration for alignment of the work piece
NOTE: possible to evaluate according ANOVA to find out dominant contributors
δl_R Resolution of meas. Instrument (CMM)
δl_C Correction - Error of the meas. Instrument given by calibration
δl_TE Correction from Thermal effects during meas. process
δl_MA Correction of misalignment – cosine error
δl_FU Correction due to fixture
Position of the point/dimensions in each axis is described with formula:
P=(x+x, y+y, z+z)
u(Px)2=u(x)2+u(x,y)+ u(x,z)
u(Py)2=u(y)2+u(x,y)+ u(y,z)
u(Pz)2=u(z)2+u(y,z)+ u(x,z)
to be continued!


